If you have an online store or a blog, you should optimise images for SEO. Photos are an excellent way to communicate your brand message and draw in an audience.
Optimising your images for SEO will not only give you higher search engine rankings and more traffic, but you may also gain traffic from social media channels.
Here is everything you need to know about tailoring your images for search engine optimisation.
Why image optimisation is important for website
Images are the life of your website. Using images in your content makes it look interactive and beautiful. They don’t just give context but can also greatly help improve lead conversions.
3 major reasons why you should optimise your images for SEO:
- To improve page load speed
- Boost websites’ SEO ranking
- Improve user experience
Here’s a guided checklist for you to get the best images on your business website!
Image source
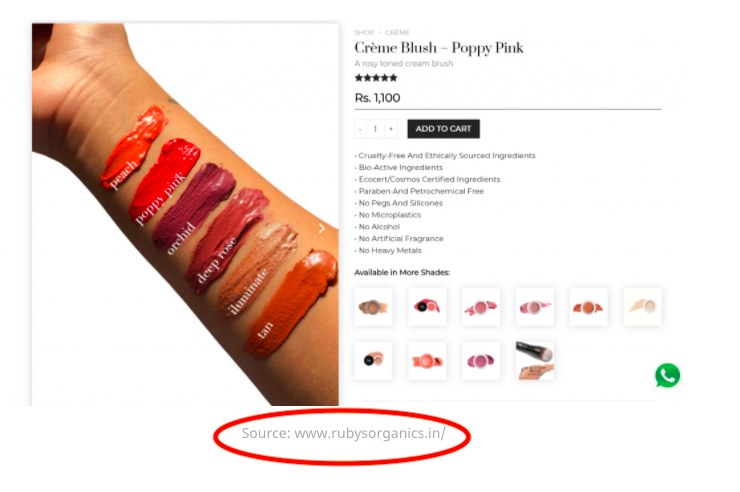
When using images for your website/product/blog, make sure they are original – your own images.
Picking up photos off the internet takes away the element of uniqueness from your content.
If you are picking up images from a source, chances are 20 other people are picking that same picture up.
Here is a short guide on getting the perfect shots for your products!
If you do not have your own images and absolutely have to use stock photos, try picking them up from free sources like Pexels, Pixabay, Pikwizard, Flickr Creative Commons etc.
File Name
When uploading a picture on your website, save the image with descriptive keywords.
For example, if your image is about a man playing with a dog, you might want to save the image as dog-man-playing.jpg instead of DSC1456.jpg or any other random letters/numbers.
By doing this, you are making your image relevant to not only what the image shows but also what your content is about.
Search engines recognize the relevance and give you priority over others.
Adjust File Size
Now that your image has been uploaded, its dimensions need to be adjusted.
The larger the image, the more time your page will take to load.
So how do you reduce the image size without compromising on the quality? There are various tools on the internet that can help you optimise your images for SEO. For example: Jpegmini, Pixlr or PicMonkey.
If you want to show large images on your web page, allow the image to open in full width in a new window. Remember to keep your images to 70 kb.
Note: Jpeg format works best for eCommerce websites. Use GIFs sparingly. PNG format is a suitable alternative to both JPG and GIF.
Alt Text & Title Text
Alt text tags are the alternative text which appears on hovering over an image. This is useful when a browser can’t render/load an image.
Make sure you use focus keywords and keep them relevant to your content. This will help your images rank on search results too! (More about website SEO here)
Here are some additional tips:
- Describe your image/product/service in the alt tags but be careful about going overboard. Don’t keyword stuff your alt tags.
- Keep it to five keywords or a set of numbers. You can also use a mix of both if you must describe a model ID of a product.
- When adding variant images for the same product (say a product in several colors), remember to use different alt tags.
Adding a title tag is optional but if you are adding one, keep it short and relevant.
Images on XML Sitemap
How do you get Google to notice your images? By using an Image on XML Sitemap via the Webmasters tool. A sitemap is like a visual map of your website, where each image is a location or country.
You will need to create your own map that way. You can add a list of images on the tool and enter specific tags for your images while adding the sitemap.
Google has a handy guide on using XML sitemaps.
Here are a few tools that can help you generate sitemaps:
Testing Images
Now that you’re done with all the groundwork, how do you know it’s working? Test your website page load speed on Pingdom or Google PageSpeed Insights.
The site will not just tell you your page load speed but will also give you pointers on what you need to fix if fixes are necessary.
What’s the best page speed load time? A recently updated report said: “sites that load in 5 seconds vs 19 seconds observed: 25% higher ad viewability (and) 70% longer average sessions (and) 35% lower bounce rates’
Other things that you can do to improve page load speed are: You can also experiment with varied sizes of images, work with vectors/raster images, and resize thumbnails intelligently to improve page load speed.
Rank at the top with Instamojo SEO-optimised stores
Instamojo free online stores are made with SEO in mind. Everything from your store URL to images is optimised for search engines so that your customers can find you easily on the web.
Check out this video on how to add products to your online store. Also, get some bonus tips on writing SEO-friendly product descriptions.